

A lot of PHP streaming tutorials get 80% of the way there and then quietly ship a bug: they echo raw cURL chunks straight to the browser and call it done. It looks fine in a five-second demo, then breaks in production the moment a chunk arrives split across a JSON boundary — which happens far more than people expect, since TCP doesn’t care about your JSON structure.
This guide builds a streaming integration that actually holds up: correct line buffering, proper [DONE] handling, and a front end that renders only the text, not raw SSE payloads. It also flags something most guides from the last couple of years don’t: gpt-3.5-turbo is being retired. OpenAI has scheduled a hard shutdown for October 23, 2026, alongside GPT-4 and several o-series models. If you’re starting fresh, build this against gpt-4o-mini or a current GPT-5-tier model instead — the code below is model-agnostic, so swapping the string is all it takes.
How Streaming Actually Works
When you send “stream”: true in a Chat Completions request, OpenAI keeps the HTTP connection open and pushes a sequence of Server-Sent Events (SSE) as the model generates tokens. Each event looks like:
data: {"id":"chatcmpl-abc","choices":[{"delta":{"content":"Hello"},"index":0,"finish_reason":null}]}

data: {"id":"chatcmpl-abc","choices":[{"delta":{"content":" there"},"index":0,"finish_reason":null}]}

data: [DONE]
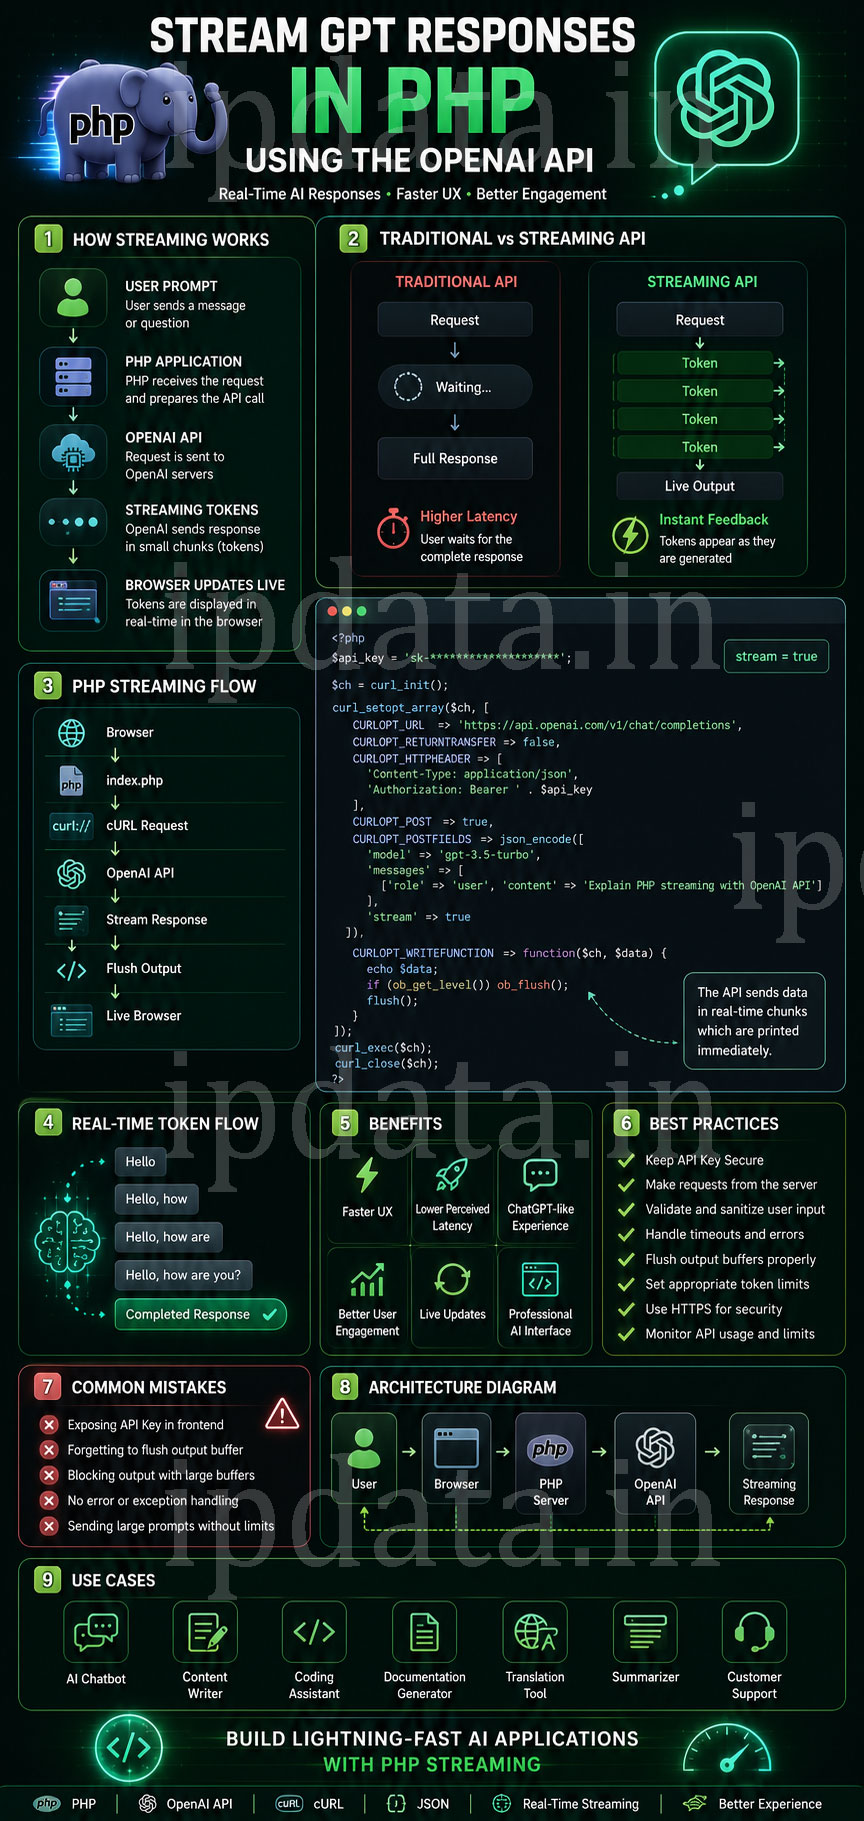
Streaming mode lets you receive a ChatGPT response token-by-token (or word-by-word) instead of waiting for the full answer. In other words, when you set “stream”: true in your API call, OpenAI will send pieces of the message as they are generated, much like ChatGPT’s typing effect. This can improve user experience on long responses, since the user sees the answer appear in real time rather than waiting. As one OpenAI developer notes, streaming returns the “completion back word-after-word (like ChatGPT)”, whereas non-streaming returns the whole response at once. To enable this, you simply include ‘stream’ => true in your request payload. The API then returns an ongoing HTTP stream where each JSON chunk contains part of the assistant’s reply. Your PHP script can read these chunks incrementally and immediately output them to the client.
Securely Storing Your API Key
Before coding, make sure your OpenAI API key is stored securely. Do not hard-code the key in your PHP scripts. A best practice is to use an environment variable or a separate config file. For example, you might put your key in your server’s environment as OPENAI_API_KEY (or in an .env file) and then in PHP use:
$apiKey = getenv('OPENAI_API_KEY');
This way the secret stays out of your source code and version control. A StackOverflow answer warns that embedding keys in code “is just asking for people to impersonate you” and recommends environment variables instead.
Writing the PHP Script to Call the API
With your key ready, create a plain PHP script (e.g. stream.php). You only need PHP and its built-in cURL extension – no frameworks or extra libraries. Below is an outline of the PHP code to make a streaming API call:
<?php
// 1. Load API key from environment
$apiKey = getenv('OPENAI_API_KEY');

// 2. Build the request data with 'stream' => true
$data = [
    'model' => 'gpt-3.5-turbo',
    'messages' => [
        ['role' => 'user', 'content' => 'Hello, how are you?']
    ],
    'stream' => true,    // enable streaming mode
    'max_tokens' => 150
];

// 3. Initialize cURL
$ch = curl_init('https://api.openai.com/v1/chat/completions');
curl_setopt($ch, CURLOPT_HTTPHEADER, [
    'Content-Type: application/json',
    'Authorization: Bearer ' . $apiKey,
    // If you use Server-Sent Events (see below), you can also add:
    // 'Accept: text/event-stream'
]);
curl_setopt($ch, CURLOPT_POST, true);
curl_setopt($ch, CURLOPT_POSTFIELDS, json_encode($data));

// 4. Tell cURL to return the transfer as a stream
curl_setopt($ch, CURLOPT_RETURNTRANSFER, false);

// 5. Define a write callback to handle each incoming chunk
curl_setopt($ch, CURLOPT_WRITEFUNCTION, function($curl, $chunk) {
    // This function is called by cURL as soon as a new piece of data is available.
    echo $chunk;              // output the chunk immediately
    ob_flush();               // flush PHP output buffers
    flush();                  // flush web server output buffers
    return strlen($chunk);    // must return the number of bytes processed
});

// 6. Execute the request
curl_exec($ch);

// 7. Handle errors and cleanup
if (curl_errno($ch)) {
    // In case of error, print it (you may also log it)
    echo 'API Error: ' . curl_error($ch);
}
curl_close($ch);
?>
Code breakdown: We set up a POST to the /v1/chat/completions endpoint with our JSON data, including ‘stream’ => true. We use CURLOPT_WRITEFUNCTION so that cURL calls our callback each time a chunk arrives. Inside that callback, we echo the chunk and immediately flush the output (ob_flush(); flush();) so it goes straight to the browser. This way, each chunk (usually containing a piece of the assistant’s choices[0].delta.content) is sent to the client as soon as it arrives. In effect, the response is processed incrementally rather than all at once.
Handling the Stream in PHP
In streaming mode, OpenAI sends a series of JSON objects, each starting with data: (if using SSE) or just raw JSON if not. The PHP callback above simply echoes whatever arrives. For a simple output, you might see pieces of JSON like:
data: {"id":"...","choices":[{"delta":{"content":"Hello"},"index":0,"finish_reason":null}]}
data: {"id":"...","choices":[{"delta":{"content":", how"},"index":0,"finish_reason":null}]}
data: {"id":"...","choices":[{"delta":{"content":" are you?"},"index":0,"finish_reason":"stop"}]}
Each echo $chunk will send that directly to the client. If you’re not using SSE on the client side (see below), you might need to remove the “data:” prefixes yourself. In any case, because we flush after each echo, the browser receives and can display the message piece by piece. This mimics a “typing” effect in the UI.
(Tip: Use set_time_limit(0); at the top if you expect long responses, to prevent PHP from timing out.)
Real-Time Display on the Web Page
To show the streamed content in the browser as it arrives, you have two common options: Server-Sent Events (SSE) with EventSource, or the Fetch API with Streams. Both let you append text to the page immediately.
Option 1: Server-Sent Events (EventSource)
Server-Sent Events is a one-way streaming protocol from server to client. To use it, have your PHP script output with an SSE-compatible header and format. For example, modify the PHP above to start with:
header("Content-Type: text/event-stream");
header("Cache-Control: no-cache");
And in your write callback (or loop) prefix each chunk with data: and two newlines. For example:
curl_setopt($ch, CURLOPT_WRITEFUNCTION, function($curl, $chunk) {
    // Assume $chunk contains plain text or JSON without "data:" prefix.
    // Prepend "data:" so it forms a valid SSE message.
    echo "data: " . $chunk . "\n\n";
    ob_flush(); flush();
    return strlen($chunk);
});
This ensures the browser’s EventSource can read the stream. On the HTML/JS side, you would write:
<div id="chatOutput"></div>
<script>
// Create an EventSource listening to our PHP stream endpoint.
const source = new EventSource('stream.php?prompt=Hello');

// Append each received message to the page.
source.onmessage = function(event) {
    document.getElementById('chatOutput').innerText += event.data;
};
</script>
As chunks arrive, the onmessage handler fires with event.data containing the text. This uses the built-in EventSource mechanism and does not require external libraries. A PHP example of an SSE loop (outside of OpenAI) looks like:
<?php
header("Content-type: text/event-stream");
while (true) {
    echo "data: " . date("H:i:s") . "\n\n";
    ob_flush(); flush();
    sleep(1);
}
?>
which demonstrates sending data: lines to the client. By analogy, our OpenAI loop sends the AI’s content.
Option 2: Fetch with ReadableStream
If you prefer a more modern JS approach, you can use fetch() and read the response.body stream manually. For example:
<div id="chatOutput"></div>
<script>
async function streamOpenAI() {
    const response = await fetch('stream.php?prompt=Hello');
    const reader = response.body.getReader();
    const decoder = new TextDecoder();
    let done = false;
    let textChunk;

    while (!done) {
        // Read the next data chunk from the stream
        const { value, done: streamDone } = await reader.read();
        done = streamDone;
        if (value) {
            // Decode and append the text to the page
            textChunk = decoder.decode(value, { stream: true });
            document.getElementById('chatOutput').innerText += textChunk;
        }
    }
}

streamOpenAI();
</script>
Here we call the same PHP URL. As each value arrives, we decode it and update the page. This uses the JavaScript Streams API so the UI can update piece-by-piece without waiting. It does not require explicit “data:” formatting on the server (though if your PHP sends SSE format, you’d strip the data: prefix in JS). Note that using reader.read() in a loop like this lets us process the incoming bytes as soon as they come, similar to how EventSource works.
- Enable streaming: Include “stream”: true in the JSON payload.
- Secure your key: Store the API key in an environment variable or external file.
- Use cURL with a write callback: Set CURLOPT_WRITEFUNCTION to echo each chunk and flush immediately.
- Output to the client: Either format the output as SSE (text/event-stream) and use EventSource in JS, or fetch the stream and read it with the Streams API.
- Flush promptly: Call ob_flush() and flush() after each echo so data is sent right away.
By following these steps, your PHP app can display GPT-3.5’s answer in real time as it’s generated. The user will see the text appear gradually, creating a smooth, interactive chat experience.
Two details matter here, and both get glossed over in quick tutorials:
- Each event is terminated by a blank line (\n\n), not just a newline. Your parser needs to buffer bytes until it sees a full event, not just echo bytes as they arrive.
- The stream ends with a literal data: [DONE] line — not an HTTP close you can rely on cleanly, and not JSON, so trying to json_decode() it will throw a silent failure if you don’t check for it first.
Step 1: Store the API Key Outside Your Code
This part hasn’t changed and shouldn’t be skipped: never hardcode a key in a PHP file that might end up in a repo, a backup, or a support ticket. Set it as a server environment variable (via your process manager, .env loader, or hosting panel) and read it with:
$apiKey = getenv('OPENAI_API_KEY');

if (!$apiKey) {
    http_response_code(500);
    exit('Server misconfiguration: missing API key.');
}
Failing loudly if the key is missing saves you a confusing debugging session later.
Step 2: A Streaming Endpoint with Correct SSE Parsing
Here’s the core script (stream.php). The key difference from a naive version: a buffer that accumulates raw bytes and only processes complete lines, so a chunk boundary landing mid-JSON never corrupts the output.
<?php
set_time_limit(0);
ignore_user_abort(true);

header('Content-Type: text/event-stream');
header('Cache-Control: no-cache');
header('X-Accel-Buffering: no'); // disables buffering on Nginx reverse proxies

$apiKey = getenv('OPENAI_API_KEY');
if (!$apiKey) {
    echo "data: " . json_encode(['error' => 'Missing API key']) . "\n\n";
    exit;
}

$prompt = isset($_GET['prompt']) ? trim($_GET['prompt']) : 'Hello!';

$payload = [
    'model' => 'gpt-4o-mini', // swap for your current model of choice
    'messages' => [
        ['role' => 'user', 'content' => $prompt],
    ],
    'stream' => true,
    'max_tokens' => 300,
];

$buffer = '';

$ch = curl_init('https://api.openai.com/v1/chat/completions');
curl_setopt_array($ch, [
    CURLOPT_POST => true,
    CURLOPT_POSTFIELDS => json_encode($payload),
    CURLOPT_HTTPHEADER => [
        'Content-Type: application/json',
        'Authorization: Bearer ' . $apiKey,
    ],
    CURLOPT_RETURNTRANSFER => false,
    CURLOPT_TIMEOUT => 0,
    CURLOPT_WRITEFUNCTION => function ($curl, $chunk) use (&$buffer) {
        $buffer .= $chunk;

        // Process only complete "data: ...\n\n" events from the buffer.
        while (($pos = strpos($buffer, "\n\n")) !== false) {
            $event  = substr($buffer, 0, $pos);
            $buffer = substr($buffer, $pos + 2);

            $line = trim(str_replace('data:', '', $event));
            if ($line === '' ) {
                continue;
            }
            if ($line === '[DONE]') {
                echo "data: [DONE]\n\n";
                @ob_flush();
                @flush();
                continue;
            }

            $decoded = json_decode($line, true);
            if (json_last_error() === JSON_ERROR_NONE && isset($decoded['choices'][0]['delta']['content'])) {
                $text = $decoded['choices'][0]['delta']['content'];
                // Re-emit as a clean SSE event containing just the text delta.
                echo "data: " . json_encode(['text' => $text]) . "\n\n";
                @ob_flush();
                @flush();
            }
        }

        return strlen($chunk);
    },
]);

curl_exec($ch);

if (curl_errno($ch)) {
    echo "data: " . json_encode(['error' => curl_error($ch)]) . "\n\n";
}

curl_close($ch);
What changed from a naive implementation, and why each change matters:
- Byte buffering with strpos($buffer, “\n\n”) — guarantees you only act on a complete event, regardless of how cURL slices the underlying TCP stream.
- Re-emitting clean JSON ({“text”: “…”}) instead of forwarding OpenAI’s raw event — the front end shouldn’t need to know OpenAI’s internal response shape at all. This also means you can switch providers later without touching client code.
- X-Accel-Buffering: no — if you’re behind Nginx (common with PHP-FPM), Nginx buffers proxied responses by default, which silently defeats streaming even if your PHP code is correct. This header turns that off for the response.
- ignore_user_abort(true) — lets you optionally detect and clean up if the visitor closes the tab mid-stream, rather than leaving a runaway process.
Step 3: Consuming the Stream in the Browser
With clean {“text”: “…”} events, the client side gets simpler, not more complex:
<div id="output"></div>
<script>
const output = document.getElementById('output');
const source = new EventSource('stream.php?prompt=' + encodeURIComponent('Explain closures in JavaScript'));

source.onmessage = function (event) {
    if (event.data === '[DONE]') {
        source.close();
        return;
    }
    const payload = JSON.parse(event.data);
    if (payload.error) {
        output.textContent += '\n[Error: ' + payload.error + ']';
        source.close();
        return;
    }
    output.textContent += payload.text;
};

source.onerror = function () {
    source.close();
};
</script>
Because the server already did the parsing work, the browser only ever deals with either plain text deltas or a clean error object — no leftover data: prefixes, no partial JSON to reassemble.
If You’d Rather Use fetch() Instead of EventSource
EventSource is simpler but GET-only and can’t set custom headers (a problem if you want to send auth tokens for your own backend, separate from the OpenAI key). If you need POST or headers, use fetch() with a ReadableStream reader and apply the same buffering logic in JavaScript:
async function streamChat(prompt) {
    const response = await fetch('stream.php', {
        method: 'POST',
        headers: { 'Content-Type': 'application/json' },
        body: JSON.stringify({ prompt }),
    });

    const reader = response.body.getReader();
    const decoder = new TextDecoder();
    let buffer = '';

    while (true) {
        const { value, done } = await reader.read();
        if (done) break;

        buffer += decoder.decode(value, { stream: true });

        let boundary;
        while ((boundary = buffer.indexOf('\n\n')) !== -1) {
            const rawEvent = buffer.slice(0, boundary);
            buffer = buffer.slice(boundary + 2);

            const line = rawEvent.replace(/^data:\s*/, '');
            if (line === '[DONE]') return;

            const payload = JSON.parse(line);
            document.getElementById('output').textContent += payload.text ?? '';
        }
    }
}
Same buffering principle as the PHP side — never assume a chunk lines up with a message boundary.
Handling Failures Gracefully
Streaming responses fail in ways a normal request doesn’t: the connection can drop mid-answer, the model can hit a content filter partway through, or your server’s own timeout can fire before the model finishes. Build for that from day one:
- Client-side reconnect: EventSource auto-reconnects on network drops by default, but your PHP endpoint needs to be idempotent-safe (don’t re-charge a user’s usage quota) if a partial retry happens.
- Track finish_reason in the delta payload — a value other than null or “stop” (like “content_filter” or “length”) tells you the response was cut short for a specific reason, worth surfacing to the user rather than silently truncating.
- Timeouts: set_time_limit(0) disables PHP’s own timeout, but your web server (Nginx, Apache) and any load balancer in front of it have their own timeout settings that need raising separately for long-running streamed responses.
A Note on the Chat Completions vs. Responses API
Everything above uses the Chat Completions endpoint (/v1/chat/completions), which remains fully supported and is what most existing PHP integrations use. OpenAI has also introduced a newer Responses API aimed at agentic and multi-turn workflows with built-in tool state. If you’re building something more complex than single-turn chat — multi-step tool use, persistent conversation state managed server-side — it’s worth checking OpenAI’s current API documentation before committing, since that surface has moved fast over the past year.
- Buffer raw bytes and split on \n\n — never assume a cURL chunk equals one SSE event.
- Re-emit clean, minimal JSON to the client; don’t leak the provider’s raw response shape into your front end.
- Set X-Accel-Buffering: no if you’re behind Nginx, or streaming will silently not stream.
- Watch finish_reason, not just the text, so truncated or filtered responses don’t look like bugs.
- gpt-3.5-turbo is on a retirement clock – point new projects at a current model from the start.
Get the buffering right and the rest of the streaming pipeline — PHP or otherwise — tends to fall into place.