


AI chatbots are no longer optional add-ons — they are the new standard for websites, SaaS platforms, internal tools, and customer support systems. And while Python dominates the AI development space, PHP powers over 77% of the web, making it critical to know how to plug cutting-edge AI into PHP projects without migrating your entire stack.
In this guide, you will learn how to build a production-ready AI chatbot in PHP using Google`s Gemini API — the same AI behind Google`s Bard and Gemini products. We`ll go far beyond a basic “hello world” API call. By the end, you’ll have:
- A working multi-turn chatbot with conversation memory
- A clean UI with AJAX-powered real-time responses
- Proper error handling and security practices
- Tips for deploying this on WordPress or any PHP host
Let`s build something real.
Why Gemini API for PHP Developers?
Before we write a single line of code, let`s understand why Gemini is the right choice for PHP-based chatbot projects:
| Feature | Gemini API | OpenAI GPT |
|---|---|---|
| Free tier | ✅ Generous | ❌ Limited |
| Multimodal (text + image) | ✅ Yes | ✅ Yes (GPT-4V) |
| PHP SDK | ⚠️ REST only | ⚠️ REST only |
| Response quality | ✅ Excellent | ✅ Excellent |
| Google ecosystem integration | ✅ Native | ❌ No |
| Rate limits (free) | 60 req/min | 3 req/min |
For PHP developers on a budget or building for Google Cloud infrastructure, Gemini is an outstanding choice.
Prerequisites
Before starting, make sure your environment has:
- PHP 7.4 or higher (PHP 8.x recommended)
- cURL extension enabled – check with phpinfo() or php -m | grep curl
- A Gemini API Key – get one free from Google AI Studio
- Basic knowledge of PHP, HTML, and JSON
Project Structure
Here`s the file layout we`ll build:
gemini-chatbot/
├── index.php          # Main UI (HTML + JS)
├── chat.php           # Backend API handler
├── config.php         # API key and settings
└── style.css          # Optional: chatbot styles
Step 1: Store Your API Key Safely
Never hardcode API keys in your PHP files. Use a config file and add it to .gitignore.
config.php
<?php
// config.php — Never commit this to version control!
define('GEMINI_API_KEY', 'YOUR_GEMINI_API_KEY_HERE');
define('GEMINI_MODEL', 'gemini-1.5-flash'); // or gemini-1.5-pro
define('GEMINI_API_URL', 'https://generativelanguage.googleapis.com/v1beta/models/' . GEMINI_MODEL . ':generateContent');
Security Tip: Add config.php to your .gitignore. On production servers, consider loading the key from environment variables using $_ENV[‘GEMINI_API_KEY’] instead.
Step 2: Build the Core PHP API Handler
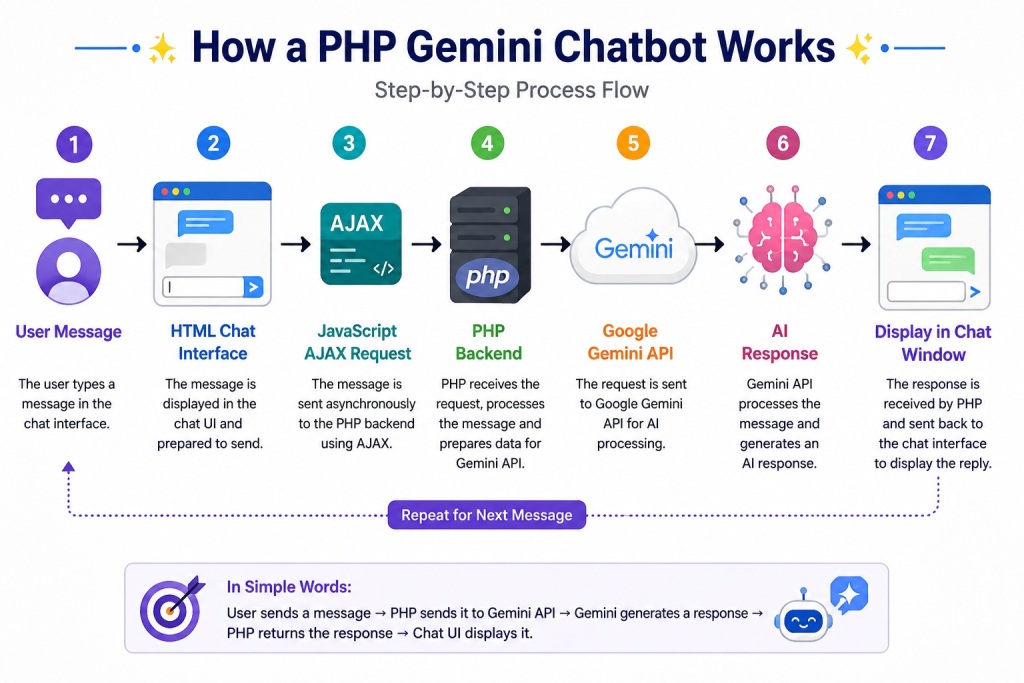
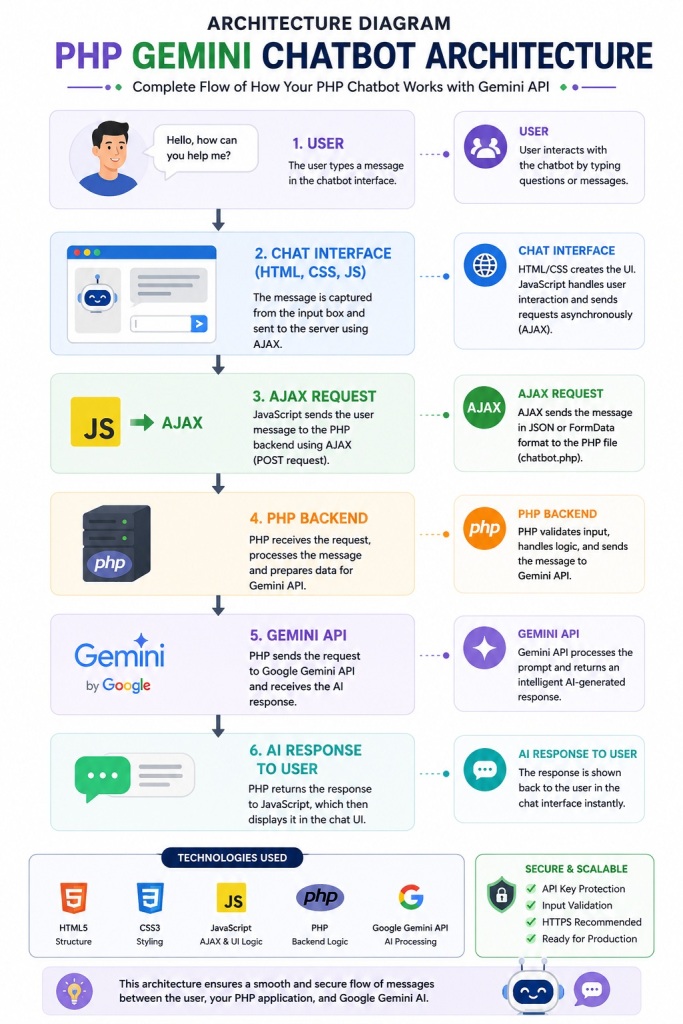
This is the engine of your chatbot — it takes a user message (plus optional conversation history), sends it to Gemini, and returns the AI`s response.
chat.php
<?php
require_once 'config.php';

// Only accept POST requests
if ($_SERVER['REQUEST_METHOD'] !== 'POST') {
    http_response_code(405);
    echo json_encode(['error' => 'Method not allowed']);
    exit;
}

// Read and decode JSON body
$input = json_decode(file_get_contents('php://input'), true);

if (empty($input['message'])) {
    http_response_code(400);
    echo json_encode(['error' => 'Message is required']);
    exit;
}

$userMessage = htmlspecialchars(strip_tags(trim($input['message'])));

// Conversation history (passed from frontend for multi-turn memory)
$history = $input['history'] ?? [];

// Build the contents array with full conversation history
$contents = [];

foreach ($history as $turn) {
    $contents[] = [
        'role'  => $turn['role'],  // 'user' or 'model'
        'parts' => [['text' => $turn['text']]]
    ];
}

// Append the latest user message
$contents[] = [
    'role'  => 'user',
    'parts' => [['text' => $userMessage]]
];

// Gemini API request payload
$payload = [
    'contents' => $contents,
    'generationConfig' => [
        'temperature'     => 0.7,   // 0 = deterministic, 1 = creative
        'maxOutputTokens' => 1024,
        'topP'            => 0.9,
    ],
    'safetySettings' => [
        [
            'category'  => 'HARM_CATEGORY_HARASSMENT',
            'threshold' => 'BLOCK_MEDIUM_AND_ABOVE'
        ],
        [
            'category'  => 'HARM_CATEGORY_HATE_SPEECH',
            'threshold' => 'BLOCK_MEDIUM_AND_ABOVE'
        ]
    ]
];

// Make the cURL request
$ch = curl_init(GEMINI_API_URL . '?key=' . GEMINI_API_KEY);
curl_setopt_array($ch, [
    CURLOPT_RETURNTRANSFER => true,
    CURLOPT_POST           => true,
    CURLOPT_POSTFIELDS     => json_encode($payload),
    CURLOPT_HTTPHEADER     => ['Content-Type: application/json'],
    CURLOPT_TIMEOUT        => 30,
    CURLOPT_SSL_VERIFYPEER => true,
]);

$response    = curl_exec($ch);
$httpCode    = curl_getinfo($ch, CURLINFO_HTTP_CODE);
$curlError   = curl_error($ch);
curl_close($ch);

// Handle cURL errors
if ($curlError) {
    http_response_code(500);
    echo json_encode(['error' => 'Connection failed: ' . $curlError]);
    exit;
}

// Handle non-200 responses from Gemini
if ($httpCode !== 200) {
    http_response_code($httpCode);
    $errorData = json_decode($response, true);
    echo json_encode(['error' => $errorData['error']['message'] ?? 'Gemini API error']);
    exit;
}

// Parse the response
$data  = json_decode($response, true);
$reply = $data['candidates'][0]['content']['parts'][0]['text'] ?? null;

if (!$reply) {
    // Possibly blocked by safety filters
    $blockReason = $data['candidates'][0]['finishReason'] ?? 'UNKNOWN';
    echo json_encode(['error' => 'Response blocked or empty. Reason: ' . $blockReason]);
    exit;
}

// Return the bot reply as JSON
header('Content-Type: application/json');
echo json_encode(['reply' => $reply]);
Step 3: Build the Frontend with Conversation Memory
A great chatbot UI needs to feel alive — instant responses, a typing indicator, and memory across the conversation.
index.php
<!DOCTYPE html>
<html lang="en">
<head>
    <meta charset="UTF-8">
    <meta name="viewport" content="width=device-width, initial-scale=1.0">
    <title>PHP Gemini AI Chatbot</title>
    <style>
        * { box-sizing: border-box; margin: 0; padding: 0; }

        body {
            font-family: 'Segoe UI', Tahoma, Geneva, sans-serif;
            background: #0f172a;
            display: flex;
            align-items: center;
            justify-content: center;
            min-height: 100vh;
        }

        .chat-container {
            width: 420px;
            height: 600px;
            background: #1e293b;
            border-radius: 16px;
            display: flex;
            flex-direction: column;
            overflow: hidden;
            box-shadow: 0 25px 60px rgba(0,0,0,0.5);
        }

        .chat-header {
            background: linear-gradient(135deg, #4f46e5, #7c3aed);
            padding: 16px 20px;
            color: white;
        }

        .chat-header h2 { font-size: 1rem; font-weight: 600; }
        .chat-header p  { font-size: 0.75rem; opacity: 0.8; margin-top: 2px; }

        .chat-messages {
            flex: 1;
            overflow-y: auto;
            padding: 16px;
            display: flex;
            flex-direction: column;
            gap: 12px;
        }

        .message {
            max-width: 80%;
            padding: 10px 14px;
            border-radius: 12px;
            font-size: 0.875rem;
            line-height: 1.5;
            white-space: pre-wrap;
            word-wrap: break-word;
        }

        .message.user {
            background: #4f46e5;
            color: white;
            align-self: flex-end;
            border-bottom-right-radius: 4px;
        }

        .message.bot {
            background: #334155;
            color: #e2e8f0;
            align-self: flex-start;
            border-bottom-left-radius: 4px;
        }

        .typing-indicator {
            display: none;
            align-self: flex-start;
        }

        .typing-indicator span {
            display: inline-block;
            width: 8px; height: 8px;
            background: #64748b;
            border-radius: 50%;
            animation: bounce 1.2s infinite ease-in-out;
            margin: 0 2px;
        }

        .typing-indicator span:nth-child(2) { animation-delay: 0.2s; }
        .typing-indicator span:nth-child(3) { animation-delay: 0.4s; }

        @keyframes bounce {
            0%, 80%, 100% { transform: scale(0.7); opacity: 0.5; }
            40%            { transform: scale(1.2); opacity: 1;   }
        }

        .chat-input-area {
            padding: 12px 16px;
            background: #0f172a;
            display: flex;
            gap: 8px;
            align-items: center;
        }

        .chat-input-area input {
            flex: 1;
            background: #1e293b;
            border: 1px solid #334155;
            color: #e2e8f0;
            padding: 10px 14px;
            border-radius: 8px;
            font-size: 0.875rem;
            outline: none;
            transition: border-color 0.2s;
        }

        .chat-input-area input:focus { border-color: #4f46e5; }

        .chat-input-area button {
            background: #4f46e5;
            color: white;
            border: none;
            padding: 10px 16px;
            border-radius: 8px;
            cursor: pointer;
            font-size: 0.875rem;
            font-weight: 600;
            transition: background 0.2s;
        }

        .chat-input-area button:hover    { background: #4338ca; }
        .chat-input-area button:disabled { background: #334155; cursor: not-allowed; }

        .error-message {
            color: #f87171;
            font-size: 0.8rem;
            text-align: center;
            padding: 4px;
        }
    </style>
</head>
<body>
<div class="chat-container">
    <div class="chat-header">
        <h2>✨ Gemini AI Assistant</h2>
        <p>Powered by Google Gemini 1.5 Flash</p>
    </div>

    <div class="chat-messages" id="chatMessages">
        <div class="message bot">
            Hello! I'm your AI assistant powered by Google Gemini. How can I help you today?
        </div>
        <div class="typing-indicator" id="typingIndicator">
            <span></span><span></span><span></span>
        </div>
    </div>

    <div class="chat-input-area">
        <input
            type="text"
            id="userInput"
            placeholder="Type your message..."
            autocomplete="off"
        />
        <button id="sendBtn" onclick="sendMessage()">Send</button>
    </div>
</div>

<script>
// Store conversation history for multi-turn memory
let conversationHistory = [];

function appendMessage(role, text) {
    const messagesDiv = document.getElementById('chatMessages');
    const typingIndicator = document.getElementById('typingIndicator');

    const msg = document.createElement('div');
    msg.classList.add('message', role === 'user' ? 'user' : 'bot');
    msg.textContent = text;

    // Insert before typing indicator
    messagesDiv.insertBefore(msg, typingIndicator);
    messagesDiv.scrollTop = messagesDiv.scrollHeight;
}

function setTyping(visible) {
    const indicator = document.getElementById('typingIndicator');
    indicator.style.display = visible ? 'flex' : 'none';
    if (visible) {
        const messagesDiv = document.getElementById('chatMessages');
        messagesDiv.scrollTop = messagesDiv.scrollHeight;
    }
}

async function sendMessage() {
    const input   = document.getElementById('userInput');
    const sendBtn = document.getElementById('sendBtn');
    const message = input.value.trim();

    if (!message) return;

    // Show user message
    appendMessage('user', message);
    input.value = '';
    sendBtn.disabled = true;
    setTyping(true);

    // Add to history
    conversationHistory.push({ role: 'user', text: message });

    try {
        const response = await fetch('chat.php', {
            method:  'POST',
            headers: { 'Content-Type': 'application/json' },
            body:    JSON.stringify({
                message: message,
                history: conversationHistory.slice(0, -1) // Send history excluding current message
            })
        });

        const data = await response.json();

        setTyping(false);

        if (data.error) {
            appendMessage('bot', '⚠️ Error: ' + data.error);
        } else {
            appendMessage('bot', data.reply);
            // Add bot reply to history
            conversationHistory.push({ role: 'model', text: data.reply });
        }

        // Keep conversation history manageable (last 20 turns)
        if (conversationHistory.length > 20) {
            conversationHistory = conversationHistory.slice(-20);
        }

    } catch (err) {
        setTyping(false);
        appendMessage('bot', '⚠️ Network error. Please try again.');
        console.error(err);
    }

    sendBtn.disabled = false;
    input.focus();
}

// Allow sending with Enter key
document.getElementById('userInput').addEventListener('keydown', function(e) {
    if (e.key === 'Enter' && !e.shiftKey) {
        e.preventDefault();
        sendMessage();
    }
});
</script>
</body>
</html>
Step 4: Understanding the Gemini API Response Structure
When Gemini responds, you get back a JSON object. Here`s what it looks like and how to read it:
{
  "candidates": [
    {
      "content": {
        "parts": [
          { "text": "Hello! How can I assist you today?" }
        ],
        "role": "model"
      },
      "finishReason": "STOP",
      "safetyRatings": [...]
    }
  ],
  "usageMetadata": {
    "promptTokenCount": 12,
    "candidatesTokenCount": 9,
    "totalTokenCount": 21
  }
}
Key fields to know:
- candidates[0].content.parts[0].text — The actual AI response text
- candidates[0].finishReason — Why the response ended (STOP, MAX_TOKENS, SAFETY, RECITATION)
- usageMetadata.totalTokenCount — Token usage (important for rate limits)
Step 5: Advanced Configuration — System Prompts & Personality
You can give your chatbot a custom personality using a system instruction, available in Gemini 1.5 models:
$payload = [
    'system_instruction' => [
        'parts' => [[
            'text' => 'You are a friendly and knowledgeable customer support agent for AcmeCorp software.
                       Always be concise, helpful, and professional.
                       If asked about pricing, direct users to acmecorp.com/pricing.'
        ]]
    ],
    'contents' => $contents,
    // ... rest of payload
];
This is what transforms a generic chatbot into a branded AI assistant specific to your product or business.
Step 6: Integrating into WordPress
To embed this chatbot inside a WordPress site, you have two clean options:
Option A – Shortcode Widget
Place the chatbot files inside a plugin or your theme, then register a shortcode:
// In your theme's functions.php or a custom plugin
function gemini_chatbot_shortcode() {
    ob_start();
    include get_template_directory() . '/chatbot/index.php';
    return ob_get_clean();
}
add_shortcode('gemini_chat', 'gemini_chatbot_shortcode');

// Use [gemini_chat] in any page or post
Option B — REST API Endpoint
Register a custom WordPress REST API route to handle the chat backend cleanly:
add_action('rest_api_init', function () {
    register_rest_route('gemini/v1', '/chat', [
        'methods'             => 'POST',
        'callback'            => 'handle_gemini_chat',
        'permission_callback' => '__return_true',
    ]);
});

function handle_gemini_chat(WP_REST_Request $request) {
    $message = sanitize_text_field($request->get_param('message'));
    $history = $request->get_param('history') ?? [];

    // ... (your cURL logic from chat.php goes here)

    return new WP_REST_Response(['reply' => $reply], 200);
}
Then your JS fetches from /wp-json/gemini/v1/chat instead of chat.php.
Common Errors and How to Fix Them
Error
Cause
Fix
API key not valid
Wrong or missing API key
Double-check key in Google AI Studio
cURL error 60
SSL certificate issue
Update CA certificates or set CURLOPT_CAINFO
Response blocked (SAFETY)
Content flagged by filters
Adjust safety thresholds or rephrase prompt
429 Too Many Requests
Rate limit hit
Add retry logic with exponential backoff
Empty candidates array
Model returned nothing
Check promptFeedback in response for block reason
| Error | Cause | Fix |
|---|---|---|
| API key not valid | Wrong or missing API key | Double-check key in Google AI Studio |
| cURL error 60 | SSL certificate issue | Update CA certificates or set CURLOPT_CAINFO |
| Response blocked (SAFETY) | Content flagged by filters | Adjust safety thresholds or rephrase prompt |
| 429 Too Many Requests | Rate limit hit | Add retry logic with exponential backoff |
| Empty candidates array | Model returned nothing | Check promptFeedback in response for block reason |
Second Project Structure
Step 1: Setup Your PHP Environment
Create a PHP file, e.g., chatbot.php.
Step 2: Write the Gemini API Chat Code in PHP
Here’s a simple example:
<?php
$apiKey = 'YOUR_GEMINI_API_KEY'; // Replace with your actual API key

$prompt = "Hello, how can I help you today?";

$data = [
    "contents" => [
        [
            "role" => "user",
            "parts" => [
                ["text" => $prompt]
            ]
        ]
    ]
];

$ch = curl_init('https://generativelanguage.googleapis.com/v1beta/models/gemini-pro:generateContent?key=' . $apiKey);
curl_setopt($ch, CURLOPT_RETURNTRANSFER, true);
curl_setopt($ch, CURLOPT_POSTFIELDS, json_encode($data));
curl_setopt($ch, CURLOPT_HTTPHEADER, [
    'Content-Type: application/json',
]);

$response = curl_exec($ch);
curl_close($ch);

// Handle response
$responseData = json_decode($response, true);
$botReply = $responseData['candidates'][0]['content']['parts'][0]['text'] ?? "No response";

echo "<strong>Bot:</strong> " . htmlspecialchars($botReply);
Step 3: Test
Put this on a local server or a live PHP-compatible host and access the file in the browser.
Optional: Add a Simple HTML Form for User Input
<form method="post">
  <input type="text" name="prompt" placeholder="Say something..." required>
  <button type="submit">Send</button>
</form>

<?php
if ($_SERVER['REQUEST_METHOD'] === 'POST' && isset($_POST['prompt'])) {
    $userPrompt = $_POST['prompt'];
    // use $userPrompt in the API call above
}
?>
Production Checklist
Before deploying to production, make sure you’ve covered:
- Rate limiting – Add per-user or per-IP request throttling to prevent abuse
- Input sanitization – Always sanitize user input before sending to any API
- API key protection – Never expose the key in frontend JS; always call from the PHP backend
- HTTPS only — Never run AI chatbots over plain HTTP
- Token budgeting – Set maxOutputTokens to control costs
- Session handling – For persistent history across page reloads, store conversation in PHP sessions or a database
- Logging – Log errors (not user messages) for debugging
What to Build Next
Once your chatbot is live, here are logical next steps to level up:
1. Add Streaming Responses — Stream tokens word-by-word using Server-Sent Events (SSE) for a ChatGPT-style experience. Gemini supports streaming via the :streamGenerateContent endpoint.
2. Connect to a Database — Store chat history in MySQL and let users resume past conversations.
3. Upload Documents/PDFs — Gemini is multimodal. You can send PDFs and images alongside text, enabling document Q&A features.
4. Add Voice Input — Use the browser’s Web Speech API to let users speak to your chatbot.
5. Use Gemini 1.5 Pro for Complex Tasks — Flash is fast and cheap; Pro is more capable for reasoning and long-context tasks (up to 1 million tokens).
| Feature | Gemini API | ChatGPT API |
|---|---|---|
| Free Tier | Yes | Limited |
| PHP Integration | Easy | Easy |
| Multimodal | Yes | Yes |
| Cost | Lower | Higher |
Building a chatbot in PHP with the Gemini API is genuinely straightforward once you understand the REST API structure and how multi-turn conversation history works. What makes this powerful isn`t the basic API call — it`s the layers on top: proper error handling, conversation memory, system prompts, and a polished UI.
Google Gemini`s free tier is generous enough to build and test a full production chatbot, making it one of the most accessible AI APIs available today.
The code in this guide is production-ready. Fork it, adapt the system prompt to your domain, and ship your first AI-powered PHP product.